
Airbag Suspension Kit Components and Fitment Checks
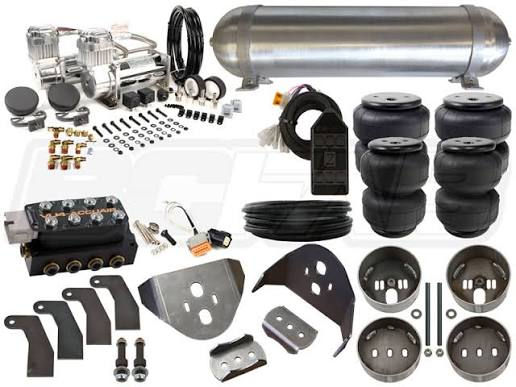
An airbag suspension kit is a vehicle-specific load-leveling system, not a universal set of air springs and brackets. Before buying or installing one, confirm that its parts match the vehicle, suspension configuration, and intended use.
Air helper springs supplement rear suspension support under a permitted load. Brackets position them, air lines and fittings supply pressure, and valves or an optional compressor control inflation. Correct fitment depends on clearance, routing, hardware, and service access.
What an airbag suspension kit can and cannot do
When correctly installed and inflated within the kit instructions, air helper springs can help level a vehicle carrying cargo or towing. They do not change the vehicle’s underlying ratings.
They do not increase GVWR, GAWR, payload, towing capacity, hitch capacity, tire capacity, axle capacity, brake capacity, frame capacity, or any component weight rating. Use the system only to support loads already permitted by the vehicle, tires, hitch, trailer, and other equipment.
Follow the vehicle manual, tire placard, hitch documentation, and kit instructions. Seek qualified advice before installation if the vehicle has suspension modifications, structural damage, uncertain fitment, or an unusual towing arrangement.
Core components and fitment checks
Most kits combine mechanical mounting parts with pneumatic components. Names vary by manufacturer, but the fitment checks are similar.
Component | Purpose | Check before installation |
Air springs | Provide adjustable supplemental support | Confirm exact vehicle application and clearance throughout suspension travel. |
Upper and lower brackets | Mount the springs at specified frame and axle points | Verify orientation, hole alignment, flush seating, and nearby clearance. |
Hardware | Secures brackets and related components | Use only supplied or specified hardware and torque procedures. |
Air line | Carries air to each spring | Keep clear of heat, sharp edges, moving parts, and pinch points. |
Fittings and valves | Connect tubing and provide inflation access | Confirm line size, secure engagement, accessibility, and leak-free connections. |
Optional compressor and controls | Enable onboard pressure adjustment | Check mounting space, protected wiring paths, electrical requirements, and service access. |
Air springs: match the chassis, not just the vehicle name
The air springs must work with the supplied brackets, frame area, axle, factory suspension, and normal suspension movement. Similar-looking vehicles may require different kits because model year, drive configuration, bed or chassis layout, factory options, and suspension equipment can vary.
Use the exact application listing and product identifier. The Retrue range includes separate applications for different vehicle configurations; match the documented vehicle rather than selecting by make alone.
Lifted or lowered vehicles require added caution. A ride-height change can alter the air spring’s working position, component travel, and bracket clearance. Do not assume a kit designed for a stock suspension fits a modified one.
Brackets and hardware: stop if alignment is wrong
Upper and lower brackets determine the air spring’s position relative to the axle and frame. If a bracket does not sit flush, align with specified mounting points, or clear nearby components, stop. Do not enlarge holes, bend parts, substitute hardware, or force alignment without manufacturer approval.
Before final tightening, compare both sides with the kit manual. Check left and right orientation where applicable, engagement of all required fasteners, and clearance from brake lines, wiring, shock mounts, exhaust parts, and axle hardware.
Use the installation manual for the exact kit identifier. A generic video or a similar-looking kit may use different mounting points, hardware, or tightening sequence.
Air lines, fittings, valves, and compressor choices
The air circuit carries pressure from inflation valves or a compressor through tubing and fittings to the air springs. Reliable operation depends on proper routing and connections.
Select a practical inflation layout
Manual-fill kits commonly use one or two accessible inflation valves. Separate fill paths may allow side-to-side adjustment; a shared layout connects both springs to one source. Use only the arrangement and fittings approved for the kit.
An onboard compressor can make adjustments easier when load conditions change frequently. It also requires a secure mounting location, protected wiring, suitable electrical protection, and controls that do not distract the driver. Confirm compatibility and installation requirements before choosing one.
Route lines for movement and inspection
Route air line along a protected path, not simply the shortest one. Allow for suspension movement as instructed. Keep tubing away from hot exhaust parts, sharp metal, rotating driveline components, tires, and locations where the axle can pinch it.
Cut tubing cleanly and squarely using the specified method. Test every connection for leaks according to the instructions. Pressure loss can change how the system supports the vehicle under load.
Place inflation valves where they remain accessible for routine checks but are protected from road debris, trailer equipment, cargo, and normal loading activity.
Vehicle-specific clearance checks
Fitment must be checked in more than one suspension position. A system that clears while parked may contact another component when loaded or moving over uneven ground.
Pre-install checklist
Before drilling, mounting, or tightening hardware:
· Confirm the exact year, make, model, drive configuration, and relevant factory options.
· Identify lift or lowering kits, aftermarket springs, auxiliary tanks, bed modifications, hitch equipment, and other changes affecting space.
· Inspect both rear sides for rust, damage, prior repairs, loose brake lines, wiring, and obstructions in the bracket area.
· Review the parts list, required tools, warnings, and instructions for the exact kit.
· Confirm that planned air-line and valve locations remain protected and accessible with the spare tire, accessories, and trailer equipment installed.
This checklist supports, but does not replace, the kit instructions. If the vehicle differs from the documented application, pause and obtain qualified advice.
Final clearance and operating checks
After installation, inspect the system at normal ride height and complete any movement or loaded-condition checks required by the manual. Check both sides for contact between air springs, brackets, lines, and nearby components.
Recheck hardware and fittings on the schedule in the instructions. Confirm that air lines cannot rub, melt, stretch, or become trapped as the suspension moves. Stay within the stated inflation limits.
If a bracket does not seat correctly, a line leaks, or any part contacts another component, do not improvise a repair. Consult the manufacturer or a qualified installer.
Cargo must still be properly secured, and the vehicle must remain within all applicable ratings.
Choose a documented application, not a near match
A suitable kit is one whose documentation matches the vehicle as it exists today. Before ordering, verify current compatibility, included components, installation instructions, warranty terms, return terms, and other product conditions with the seller.
Avoid relying on broad claims such as “fits most trucks,” especially when the vehicle has altered suspension or unusual equipment. Exact fitment, correct installation, and regular inspection matter more than a near match.
Frequently asked questions
Can an airbag suspension kit increase payload or towing capacity?
No. Air helper springs can assist load leveling, but they do not increase vehicle or component weight ratings. Stay within GVWR, GAWR, payload, tire, hitch, and towing limits.
Do I need an onboard compressor?
Not always. Manual-fill valves may suit occasional adjustments. A compressor can be useful for frequently changing loads if it is compatible with the kit and installed correctly.
Will a stock-height kit fit a lifted truck?
Do not assume it will. Ride-height changes can affect air spring position, travel, and clearance. Confirm support for the exact modified configuration.
What should I do if an air line leaks?
Follow the kit’s leak-testing and repair instructions. Inspect the tubing cut, fitting engagement, routing, and damage. Do not use a compromised system under load if the cause is unclear.


