
How to Build a Salt Therapy Room with Himalayan Salt Bricks
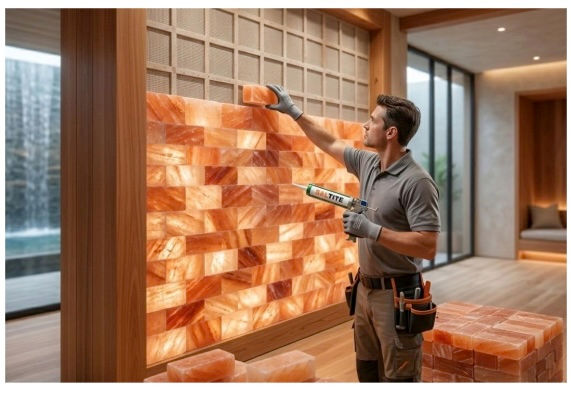
To build a salt therapy room with salt bricks, prepare a dry, strong space and plan the salt wall, humidity, HVAC, ventilation, lighting, electrical system, seating, and therapy equipment together. Himalayan salt bricks average 8 × 4 × 2 inches and 5.2 lb each and require structural support and moisture management for a stable, long-term installation.
Step-by-Step Guide to Build a Salt Therapy Room
1. Plan the Room
Begin with the room dimensions and determine how much salt wall, seating, equipment, ventilation, and lighting are required.
What You Need to Plan
Room size and user capacity
Salt-wall location and coverage
Halogenerator position
HVAC supply and return
Electrical points
Door and emergency access
Equipment service space
2. Prepare the Room
The room should be clean, dry, stable, and suitable for the planned installation. Complete major construction before installing salt bricks.
What to Check Before Installation:
Wall strength
Floor condition
Ceiling condition
Moisture sources
Wall flatness
Door placement
Electrical and HVAC routes
3. Prepare the Salt-Wall Substrate
Use a strong, stable substrate capable of supporting the calculated salt-wall load. Repair cracks and remove loose materials before installation.
Important checks include:
Structural capacity
Surface stability
Flatness
Dryness
Moisture protection
Total salt-wall weight
4. Calculate Salt Bricks and Wall Load
Before placing the order for the materials, you must measure the surface area of the wall itself. Since one face of a single 8 × 4-inch brick only covers around 32 square inches, it takes about 4.5 bricks per square foot, not including joints or cut bricks.
Use:
Wall area × bricks per square foot × brick weight = approximate salt-brick load
Also consider adhesive, framing, backing, and mounting components.
For commercial projects, contractors can also review why contractors choose salt wall kits for commercial spaces for additional material-planning considerations.
5. Plan the Salt Brick Layout
Pre-assemble the bricks before making the final installation. This plays a crucial role in keeping everything lined up and avoiding any unexpected cutting or drilling.
Plan accordingly:
Brick pattern
Joint spacing
Corners
Cuts
Electrical openings
Lighting positions
Natural color variations
6. Install Himalayan Salt Bricks
Set the bricks to the prepped substrate using a compatible salt brick adhesive or an approved mounting system. Apply and cure according to manufacturer instructions
Before installation, learn whether regular construction adhesive can be used on salt bricks and why adhesive compatibility matters.
What to Avoid
Damp surfaces
Weak substrates
Excess adhesive
Uneven pressure
Unsupported sections
Hammering
Unplanned drilling
7. Design HVAC and Ventilation
HVAC and ventilation should be designed according to room size, occupancy, humidity, temperature, airflow requirements, and halogenerator specifications. Avoid using one universal airflow rate for every room.
Plan for:
Supply-air distribution
Return or exhaust air
Air circulation
Filtration
Humidity control
Equipment ventilation
Maintenance access
8. Install the Halogenerator
An active therapy room requires a compatible halogenerator to produce controlled dry salt aerosol. Salt bricks do not independently create a controlled therapeutic aerosol.
Component | Function |
Salt bricks | Architectural salt-wall finish |
Halogenerator | Produces dry salt aerosol |
HVAC | Controls room airflow |
Seating | Supports user comfort |
Use only the salt specified by the halogenerator manufacturer.
9. Control Humidity and Moisture
Remember Himalayan salt is hygroscopic — it attracts moisture from the air. While around 40%–60% relative humidity can be a good goal for interior spaces, the target range should depend on the room design, climate, equipment, and the specifications from the manufacturers.
Control the following:
Relative humidity
Condensation
Temperature
Airflow
Water exposure
Moisture sources
Avoid direct water and persistent condensation around the salt wall.
10. Install Warm LED Lighting
Himalayan salt gets its more natural pink, orange, and amber shades when you warm it with soft lighting.
Recommended options include:
2700K–3000K warm-white LEDs
Concealed backlighting
Dimmable LED strips
Low-heat fixtures
Accessible LED drivers
Protected wiring
A 2–4-inch lighting cavity can provide space for concealed illumination when compatible with the wall design.
Pink salt wall can also provide inspiration for combining Himalayan walls with warm architectural lighting.
11. Add Seating and Interior Finishes
Opt for comfortable, durable, and easy to clean finishes with the furniture. Remove any blockage around doors, ventilation, and equipment.
Consider:
Reclining chairs
Lounge seating
Easy-clean materials
Durable flooring
Clear walking space
Staff access
12. Complete Electrical and Safety Work
Electrical systems should comply with applicable local requirements and the specifications of the installed equipment.
Check:
Correct electrical ratings
Grounding
Cable protection
LED drivers
Equipment connections
Outlet locations
Maintenance access
Keep electrical components protected from moisture.
13. Finish the Doors, Floor, and Ceiling
Complete major room finishes before final salt-wall installation where practical.
Check:
Door operation
Door sealing
Flooring
Ceiling
HVAC openings
Equipment penetrations
Cleaning access
14. Test and Commission the Room
Test the complete room before opening it for use.
Verify:
Salt-brick stability
Wall load support
Halogenerator operation
Aerosol delivery
HVAC performance
Ventilation
Humidity
Lighting
Electrical systems
Equipment access
15. Create a Maintenance Plan
Regular inspections help identify moisture, structural, HVAC, and equipment problems early.
Inspect for:
Cracked bricks
Loose bricks
Moisture
Condensation
Salt residue
Adhesive failure
HVAC problems
Halogenerator issues
Follow manufacturer-specific maintenance instructions and avoid unnecessary water exposure.
Salt Therapy Room Requirements
A professional therapy room requires suitable construction, environmental control, salt wall materials, and equipment.
Requirement | Purpose |
Strong substrate | Supports salt-brick weight |
Salt bricks | Creates the salt-wall feature |
Compatible adhesive | Secures bricks |
HVAC system | Controls temperature and airflow |
Ventilation | Supports air circulation |
Humidity control | Helps protect hygroscopic salt |
Halogenerator | Produces controlled dry salt aerosol |
LED lighting | Creates warm salt-wall ambience |
Seating | Provides user comfort |
Electrical system | Powers lighting and equipment |
Service access | Allows maintenance |
Passive Salt Room vs. Active Salt Therapy Room
Passive Salt Room | Active Salt Therapy Room |
Uses salt-wall materials | Uses a halogenerator |
Primarily architectural and ambience-focused | Produces controlled dry salt aerosol |
No halogenerator required | Requires dedicated equipment |
Salt bricks provide the visual environment | Halogenerator controls aerosol delivery |
A Himalayan salt wall alone should not be described as active salt therapy.
Common Mistakes to Avoid
Installing bricks on damp surfaces
Underestimating wall load
Using unsuitable adhesive
Installing on a weak substrate
Ignoring humidity
Allowing condensation
Planning HVAC too late
Blocking ventilation
Using incorrect halogenerator salt
Poor equipment access
Unsafe electrical installation
Hammering or heavily impacting bricks
Making unsupported medical claims
Conclusion
A successful salt therapy room requires coordinated planning for the substrate, salt-brick load, humidity, HVAC, ventilation, lighting, electrical systems, seating, and therapy equipment. Himalayan salt bricks provide the architectural environment, while a compatible halogenerator produces the controlled dry salt aerosol required for an active halotherapy room.
Before opening the room for use, verify the structural support, equipment operation, airflow, humidity, lighting, electrical systems, and maintenance access. Follow manufacturer instructions and applicable local building, electrical, fire, and health requirements.
Frequently Asked Questions
Can Himalayan salt bricks create a salt therapy room?
Himalayan salt bricks can create the architectural environment of a salt room, but the bricks alone do not produce controlled dry salt aerosol. An active halotherapy room requires compatible equipment, such as a halogenerator.
Is a halogenerator necessary?
Yes, for active salt therapy. It is not required for a decorative or passive salt room.
What size are Himalayan salt bricks?
The typical size appears to be an average of 8 × 4 × 2 inches, but the sizes and weight can vary by supplier.
Can salt bricks provide salt therapy by themselves?
No. Salt bricks provide the architectural salt-wall environment. A compatible halogenerator is required to produce controlled dry salt aerosol.


