How to Convert a 2D Floor Plan Into a 3D Model
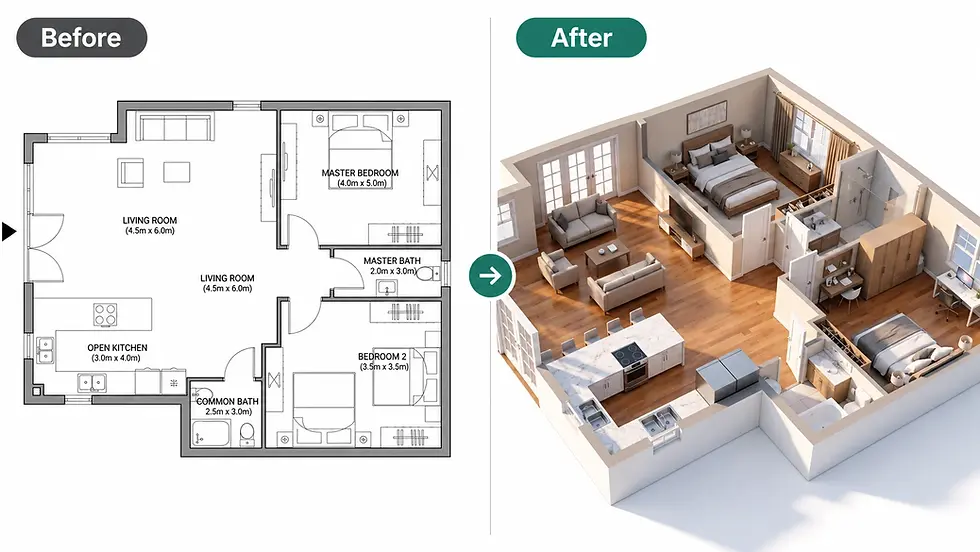
A floor plan provides a clear overview of a property's layout, showing the arrangement of rooms, walls, doors, and windows. However, understanding how these elements translate into a three-dimensional space can be challenging, especially for people who are not familiar with architectural drawings.
A bedroom may appear spacious on paper but feel different when viewed in three dimensions. An open-plan kitchen and living area may have a logical layout in 2D, yet its proportions, furniture placement, and circulation paths can be difficult to visualize.
Converting a 2D floor plan into a 3D model offers a more intuitive way to explore a property's design. By presenting rooms with visible depth, height, and spatial relationships, a three-dimensional representation helps homeowners, designers, and real estate professionals better understand how a space might look and function.
Why Convert a 2D Floor Plan Into 3D?
Traditional floor plans are useful for communicating dimensions and spatial organization. They show where rooms are located and how different areas connect, but they do not always communicate the experience of moving through a home.
A 3D model adds another layer of understanding by representing walls, openings, furniture, and other elements in a more familiar visual format.
There are several reasons to make this conversion.
Understand spatial relationships more clearly. A three-dimensional view helps users see how rooms connect, how walls define different areas, and how the layout works as a whole.
Evaluate furniture placement. Adding furniture to a 3D representation can help reveal whether a room feels crowded or whether a proposed arrangement leaves enough usable space.
Explore design possibilities. Homeowners and interior designers can use 3D visualization to discuss materials, colors, finishes, and furnishing concepts before making major decisions.
Improve communication. A 3D model can make a design easier to explain to clients, family members, or other project stakeholders who may find technical drawings difficult to interpret.
Support property marketing. Real estate professionals can use three-dimensional visualizations to provide additional context alongside photographs, floor plans, and property descriptions.
A 3D model is not a replacement for an accurate architectural drawing. Instead, it complements the floor plan by making the proposed space easier to understand visually.
Step 1: Prepare a Clear 2D Floor Plan
The quality of the source floor plan has a significant influence on the usefulness of the resulting 3D model.
Before beginning, review the drawing and make sure the main architectural elements are visible. These typically include exterior and interior walls, doors, windows, room boundaries, and any important structural features.
If the floor plan contains dimensions, check that they are legible and consistent. Accurate measurements are particularly important when the model will be used to evaluate furniture fit, circulation, or renovation options.
Floor plans can come from several sources:
Existing architectural drawings or blueprints
Digital floor plans exported from design software
Scanned copies of printed plans
Hand-drawn sketches showing a proposed room arrangement
Preliminary layouts created during a renovation discussion
If you only have a rough sketch, it may be helpful to convert it into a cleaner two-dimensional drawing first. An online convert sketch to floor plan free online workflow can help turn a suitable hand-drawn layout into a more organized floor plan for further review.
Regardless of the source, check the converted drawing against the intended layout before using it as the basis for a 3D visualization.
Step 2: Choose a Suitable 2D-to-3D Conversion Workflow
Once the floor plan is ready, choose a workflow that matches the purpose of the project.
Some projects require a technically accurate model with verified dimensions and adjustable architectural components. Others only need a visual concept to communicate the general appearance and arrangement of a space.
For early design exploration, an AI-assisted convert 2D floor plan to 3D model free online AI tool provides a convenient starting point for transforming a flat layout into a three-dimensional representation.
The appropriate workflow depends on the source material, the level of detail required, and the intended use of the result.
For example, a homeowner comparing renovation ideas may prioritize visual clarity and the overall room arrangement. An architect preparing construction documentation will generally require a more controlled modeling process with verified dimensions and appropriate technical tools.
Before starting, determine whether the goal is conceptual visualization, presentation, furniture planning, or a dimensionally reliable architectural model. This distinction helps establish realistic expectations for the output.
Step 3: Review the Walls, Doors, and Windows
Walls, doors, and windows form the structural framework of a floor plan. If these elements are represented incorrectly, the resulting 3D visualization may communicate a different space from the one originally intended.
Begin by checking the overall room arrangement. Make sure the major boundaries remain consistent with the source drawing and that adjoining rooms connect in the correct locations.
Next, review the placement of doors and windows. These openings influence natural light, furniture positioning, privacy, and circulation.
Pay particular attention to:
The location of entrances and internal doorways
Window positions along exterior walls
Connections between adjacent rooms
Hallways and circulation routes
Fixed architectural features that affect the usable space
If the 3D result introduces extra walls, removes openings, or changes the original layout, revise the model or regenerate the visualization as appropriate.
For conceptual presentations, minor visual differences may be acceptable. For projects involving renovation or construction, the geometry should be checked against reliable measurements and architectural documentation.
Step 4: Add Furniture and Interior Elements
After confirming the main layout, consider how furniture and interior elements will help communicate the space.
A basic architectural model can show room volumes and wall positions, while a furnished visualization offers a more recognizable picture of how the property could be used.
For a living room, this might include a sofa, coffee table, television unit, and occasional chairs. A bedroom may require a bed, bedside tables, and wardrobes. A kitchen could include cabinetry, counters, and appliances.
Furniture should be scaled appropriately to the available space. Oversized pieces can make a room appear cramped, while undersized objects may give a misleading impression of its proportions.
It is also important to preserve realistic circulation. Doors should remain accessible, walkways should not be blocked, and furniture should be arranged in a way that supports the room's intended function.
When the purpose is to compare design alternatives, begin with a simple arrangement. Once the spatial relationships are clear, explore additional furniture layouts or decorative details.
Step 5: Explore Materials, Colors, and Lighting
One of the main advantages of 3D visualization is the ability to explore how different design choices may affect the appearance of a space.
The same floor plan can support a variety of visual directions. Light-colored walls and natural wood finishes may create a bright, understated atmosphere, while darker materials and contrasting textures can produce a more dramatic look.
Lighting also affects how a room is perceived. Natural light, artificial lighting, and the position of windows can influence the apparent depth, brightness, and mood of an interior.
When comparing design options, consider the relationship between the finishes rather than evaluating each element independently.
For example, flooring, wall colors, cabinetry, and furniture should work together as part of a consistent palette. A well-organized visual concept makes these relationships easier to communicate before materials are purchased.
However, rendered colors and textures may differ from physical materials under real lighting conditions. Use material samples and product specifications when making final purchasing decisions.
Step 6: Inspect the 3D Model From Different Angles
A single perspective may not reveal every issue in a proposed layout. Once the initial model is available, examine it from multiple viewpoints.
A view from above can help communicate the overall room arrangement. An eye-level perspective may provide a better understanding of room proportions, furniture height, and the relationship between different interior elements.
During this review, look for potential problems such as:
Furniture blocking doors or windows
Narrow circulation paths
Awkward connections between rooms
Inconsistent wall heights or openings
Furniture arrangements that do not match the room's intended use
If the model is intended for presentation, check that the camera angles clearly communicate the most important features without distorting the perceived proportions.
If it is intended for detailed planning, verify dimensions and architectural information separately. A visually convincing rendering does not necessarily guarantee geometric accuracy.
Common Challenges When Converting Floor Plans to 3D
Although the conversion process can make spatial information easier to understand, several limitations deserve attention.
Incomplete Source Information
A 2D floor plan may not specify ceiling heights, wall thicknesses, structural details, or the exact dimensions of openings. When this information is missing, the resulting model may rely on assumptions.
Provide additional measurements when possible and verify any important details before using the model for technical decisions.
Distorted Room Proportions
An image-based conversion may interpret the drawing incorrectly, especially when lines are faint, dimensions are unclear, or the source image is distorted.
Compare the output with the original plan and correct any obvious discrepancies.
Unrealistic Furniture Scale
Furniture that looks attractive in a rendering may not fit the actual room. Check the dimensions of large pieces and preserve adequate clearance around doors, seating, and walkways.
Confusing Visualization With Construction Documentation
A 3D rendering is primarily a visual communication tool unless it is backed by a properly constructed and verified model. It should not automatically be treated as a construction-ready representation.
Structural modifications, building systems, and dimension-sensitive decisions require appropriate professional review.
Who Can Benefit From 3D Floor Plan Visualization?
Three-dimensional floor plan visualization is useful across several stages of residential planning.
Homeowners can explore possible furniture arrangements, understand the relationship between rooms, and communicate renovation ideas more clearly.
Interior designers can use 3D representations to discuss layouts, coordinate finishes, and present design concepts to clients.
Real estate agents can supplement property photographs with additional views that help buyers understand the layout of a home.
Architects and building professionals can use visual models to support design discussions, provided the modeling workflow and source data meet the technical requirements of the project.
The level of detail should match the intended application. A preliminary visualization may be sufficient for comparing design ideas, while a construction project requires more rigorous documentation.
Final Thoughts
Converting a 2D floor plan into a 3D model provides a more intuitive way to understand how a home is organized and how its rooms may look in practice.
The process begins with a clear source drawing, followed by conversion, architectural review, furniture planning, and visual refinement. Each step contributes to a more useful representation of the space.
AI-assisted tools can make early visualization more accessible, particularly when users want to explore a layout without building a detailed model from scratch. However, the output should always be reviewed against the original plan, and important dimensions should be verified independently.
By combining a reliable floor plan with thoughtful three-dimensional visualization, homeowners, designers, and real estate professionals can communicate ideas more clearly and make better-informed decisions about the spaces they plan to create.