Setting Up a Robot Lawn Mower on an Australian Block: A Spring Weekend Guide
Spring in Australia means grass returning, temperatures warming, and a narrow window before summer growth gets away from you. If you've just bought a robot lawn mower for easy installation, your goal is to have it running autonomously by mid-September — before the mowing season ramps up and you're scrambling to keep pace. The good news: modern wire-free systems can genuinely be set up in a weekend. The practical catch: you need to think through Australian-specific yard features that most generic setup guides skip. Here's how to do it properly.
Step 1: Choosing Your Charging Dock Location
The charging station (dock) is your mower's home base. It needs a clear, level spot with open sky view — essential for GPS signal reception if your system uses satellite positioning. For Australian blocks, this usually means:
A corner of the patio or concrete path (stable, level ground)
Under a pergola or shade structure (protects from intense Australian summer UV, but keep overhead clear)
Away from dense tree cover (satellite signal weakens under canopy)
Accessible to the mower without forcing it through tight passages
Avoid placement near rainwater tanks (common on Australian properties) — the tank structure can interfere with GPS reception. Similarly, keep the dock away from Hills Hoist base posts or metal structures that might create RF interference.
Place the dock roughly centrally to your mowing zones if possible — it reduces average run time and battery drain.
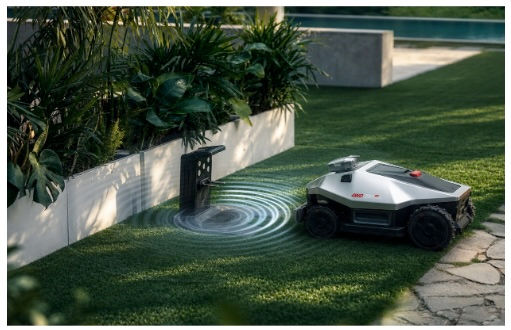
Step 2: Initial Mapping Run
Once the dock is positioned and powered, launch the mower's companion app (available for most automated mower with mobile app systems). The initial mapping pass involves driving the mower around your lawn's perimeter while the app captures the boundary via GPS, camera vision, or a combination of both. This typically takes 15–30 minutes for a suburban Australian block.
During this pass, the mower learns where lawn meets patio, fence, garden bed, or driveway. It's building a digital map, not burying wire — no excavation, no stakes, no weekend of manual trenching like older systems required.
Step 3: Define No-Go Zones (The Australian Specifics)
After the base map is captured, refine it in the app by drawing no-go areas. This is where Australian properties differ from generic suburban lawns. You'll need to exclude:
Hills Hoist and Rotation Radius: The iconic Australian rotary clothesline has a wide swing radius when turning. Define a circular no-mow zone around the base — approximately 3–4 meters (10–13 feet) diameter, depending on your specific model. Check the clothesline's arc of movement.
Rainwater Tanks: Common on Australian properties. Tank bases and surrounding piping should be excluded. If the tank has a removable access cover or tap, give it a wide buffer (1–2 meters) so the mower doesn't risk collision if you need to approach it.
Septic System / Inspection Ports: If your property uses a septic system (common in rural Australia), mark the inspection access point as a no-mow zone. These covers can be damaged by mower wheels, and you need clear access for maintenance.
Pool and Spa Fencing/Gates: If you have a pool, define the entire fenced perimeter and gate area as no-mow. Include any pool pump equipment, filter housings, or nearby structures.
Barbecue and Outdoor Dining Areas: Exclude fixed BBQ structures, table bases, and benches. The mower will navigate around smaller obstacles, but permanent fixtures deserve their own no-go buffer.
Garden Beds and Decorative Plants: Use the app to draw no-mow zones around established flower beds, shrub plantings, or ornamental features. This also protects against Kikuyu grass runners creeping into beds — the mower won't maintain a tight edge if you exclude the zone entirely.
Step 4: Create Independent Zones and Name Them
Most app-based systems support multi-zone mowing. On a typical Australian block with a front lawn, back lawn, and possibly a side area, create separate zones:
Front Zone: Formal garden area near the street, often smaller and more manicured
Back Zone: Main lawn area, typically larger
Side Zone: Utility area or secondary lawn (if applicable)
Name these clearly in the app. Then, set independent parameters for each:
Cutting height (front might be 2.5 cm / 1 inch for appearance; back might be 3.5 cm / 1.4 inches for durability)
Mowing frequency (front might run 3x weekly; back 2x weekly depending on growth)
Mowing time windows (many Australian properties schedule mowing for early morning or late afternoon to avoid peak heat and heat stress on the grass)
Step 5: Schedule and Launch
Once zones are defined and settings locked in, create your mowing schedule in the app. For spring Australian conditions (late August through October), aim for:
Front lawn: 3 times per week at fine height
Back lawn: 2–3 times per week at slightly taller height
Early morning slots (6–8 AM) to avoid midday heat stress
Most automated mower with mobile app systems let you stagger zone schedules — the mower handles one zone per session, then docks, charges, and resumes on the next scheduled zone. This distributes wear and extends battery life.
Enable any automatic rain-return feature (most systems pause mowing if rain is detected) to avoid cutting wet grass and mud tracking.
FAQ
How long does the full setup really take?Typically 45 minutes to 2 hours total, including dock placement, initial mapping, zone definition, and schedule creation. Most of that is app-based work, not physical setup.
Do I need to adjust zones seasonally?Not strictly, but it helps. Spring grass grows fast — you might increase mowing frequency. By summer, reduce frequency slightly once growth stabilizes. Update zones as needed via the app.
What if I add a new garden bed mid-season?Simply draw a new no-go zone in the app. The mower's next mowing cycle respects the updated boundary — no re-mapping required.
Can the mower handle the Hills Hoist rotating during operation?Unlikely to collide if you've given the rotary clothesline adequate buffer. But to be safe, keep the dock and mowing schedule clear of times when the clothesline is actively in use.
The Bottom Line
A modern robot lawn mower for easy installation can genuinely be ready to run by Sunday afternoon if you plan thoughtfully around Australian-specific features. The key is mapping carefully, excluding the right zones upfront (Hills Hoist, rainwater tanks, pool fencing, septic ports), and creating independent schedules for your property's distinct zones. For detailed setup instructions specific to your mower model, check the manufacturer's app guide — GOKO's setup documentation on gokorobo.com, for example, includes Australian-specific examples for property layout. Once you've done this groundwork, your automated mower with mobile app control runs autonomously, and you reclaim your weekends before the rush of spring growth.