
Golf Simulator Home Setup: Everything You Need for an Indoor Golf Room
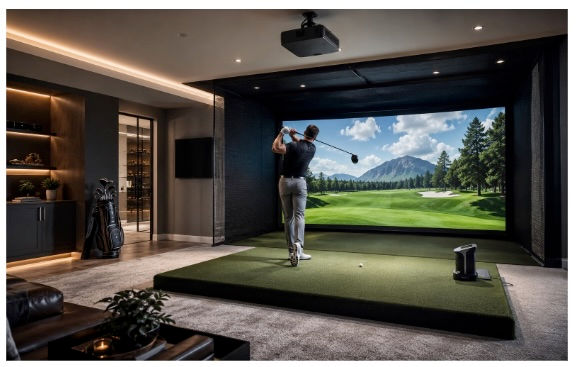
Installing a home golf simulator seems like one of those projects that ends up being problem-free on paper, but in reality it isn't. That room that seemed tailor-made for you now has a ceiling that is six inches too low. The projector you purchased just doesn't have a range. The hitting mat you purchased is a half inch above the surrounding floor, and causes errant shots on every swing. None of these are hard problems, but they are much easier to solve if you do it before you spend any money rather than afterward. This guide contains everything you need to know before the first bit of kit lands on your doorstep.
How Much Space Do You Need for a Home Golf Simulator?
Space is the first thing to nail down, and it needs to happen before any equipment decision. The minimum workable dimensions for a full-swing home golf simulator setup are typically 10 feet of ceiling height, 12 feet of width, and 15 feet of depth, though more is better in every direction. A taller ceiling gives you margin for upright swings and overhead mounts; a wider room gives you room for left-handed players and side protection; more depth means a more comfortable hitting distance from the screen.
Dimension | Minimum | Recommended |
Ceiling Height | 9 ft | 10–12 ft |
Room Width | 10 ft | 12–15 ft |
Room Depth | 14 ft | 16–20 ft |
Hitting Distance from Screen | 8 ft | 10–12 ft |
Where Can You Set Up a Home Golf Simulator?
Not every room is equally suited to a simulator. The right choice usually comes down to ceiling height, noise tolerance, and how much you're willing to modify the space.
Dedicated golf simulator room: The cleanest option, a room purpose-built or fully converted for the simulator. You control lighting, flooring, acoustics, and layout without compromising anything. If the budget and space allow it, this is the approach that produces the best long-term experience.
Garage golf simulator: Garages are a popular choice because they typically have the width and depth needed, and they're separate from living areas so noise isn't a problem. However, the main challenges are ceiling height and climate control.
Basement setup: Basements can work well, but ceiling height is the most common obstacle. If the ceiling height clears 9 feet or more and you can manage humidity, a basement is one of the better options acoustically and climatically.
Multi-purpose room: Some setups share space with a home gym, media room, or living area. This works if the hitting bay is positioned so the rest of the room remains usable, and if the screen and enclosure don't dominate the space. Retractable screens and folding enclosures make this more viable than it used to be.
What Equipment Do You Need for a Golf Simulator?
The equipment list for the best golf simulator for home setup is longer than most buyers initially expect. Each component serves a specific function, and skimping on the wrong one affects the whole experience.
Launch Monitor
At the heart of the whole setup is the launch monitor, which measures ball and club data for each shot then sends that information to the software. They range from camera-based systems that mount above or behind the ball to radar-based units that rest on the floor several feet behind the hitting position. For home setups with lower ceilings, camera-based overhead systems are often more practical because they don't require additional room depth behind the golfer.
Impact Screen
The impact screen takes the physical hit on every shot and displays the projected image. It needs to handle repeated ball strikes without degrading; it also needs to hold tension evenly for a sharp projected image. Look for a multi-layer woven screen with reinforced edges and a mounting system that keeps it taut. Cheap screens wrinkle over time, which distorts the projection and shortens the screen's life significantly.
Enclosure or Frame
The enclosure holds the screen in position and contains errant shots that miss the screen. A solid frame keeps the screen tensioned correctly as well as prevents the screen from moving on impact. Look for steel or aluminum construction with proper corner joints; a frame that flexes or shifts will cause screen tension problems and noise.
Golf Hitting Mat
The mat is where you stand when hitting a shot, and it is also what the ball sits on when you hit your shot, so it impacts the feel of each shot as well as the accuracy of launch monitor data. For home golf simulators, find a mat that includes fairway, rough, and tee areas that sits even with surrounding flooring. A mat that sits even slightly elevated changes your stance angle on every swing.
Projector or Display
The projector is the visual interface that takes simulator software and turns it into things like your course, shot tracer, and data overlays. Most home setups do prefer short-throw projectors, as these can sit closer to the screen thanks to needing less distance between lens and surface. Look at the throw ratio and ensure that it is capable of throwing an image large enough for a full screen well within the available distance in your room.
Golf Simulator Software
How golf simulators work? Software-wise, golf simulator software works in a simple way: the launch monitor spits data to the software and translates that information into how the ball would fly on a virtual course. It decides what’s on offer in terms of courses, how realistic the physics feel, what practice modes are available, and how data is tracked over time. Subscriptions on some platforms; one-time purchases on others. Check if it is compatible with your launch monitor before purchasing.
Computer or Compatible Device
The software runs on a dedicated computer, which needs enough processing power to render course graphics and handle real-time data from the launch monitor without lag. Most simulator platforms specify minimum hardware requirements. This isn't a place to use an old laptop that's been sitting in a drawer.
Side and Ceiling Protection
Even with a full enclosure, shots that catch the frame or miss wide can reach walls and ceilings. Foam padding on sidewalls, protective netting on the ceiling, and impact foam on any exposed structural elements protect both the room and the equipment from repeated ball strikes. It's the last component most people budget for and the one they wish they'd sorted earlier.
Common Home Golf Simulator Setup Mistakes You Must Avoid
These mistakes come up consistently among people who set up a home golf simulator without planning thoroughly first.
Buying equipment before measuring the room: Ceiling height and room depth determine which launch monitors and projectors will even work, so measure first.
Choosing the wrong launch monitor for the space: Radar units need specific positioning distances that some rooms can't accommodate. Camera systems have their own mounting requirements. Confirm before purchasing.
Putting the hitting area too close to the screen: Less than 8 feet between the hitting position and the screen is uncomfortable and can create data accuracy issues. Build in more space than you think you need.
Ignoring left-handed players: A setup designed around a right-handed swing may not leave adequate side clearance for a left-handed golfer. Check width in both directions.
Forgetting side protection: Walls take hits from wide shots more often than expected. Add padding before the first session, not after the first mark appears on the drywall.
Ignoring lighting and glare: Overhead ambient light washes out projected images significantly. Blackout blinds, dimmable lights, and correct projector positioning all matter for image quality.
Spending too much on features you won't use: A home setup doesn't need every feature a commercial venue requires. Buy for how you'll actually use it, rather than a feature list that sounds impressive in a spec sheet.
Conclusion
A home golf simulator, if properly constructed, is one of the most helpful practice tools which a serious golfer can build. The gear has never been hotter, the software is really immersive, and the chance to take real shots, with real data, any time of day or night is resetting how we think about practice. Get the basics right: plan the space first, organize an equipment list around that space, and do not sweat anything else. That investment yields much greater dividends when the setup isn't actually jammed into a room it doesn't fit in.


